Pattern Review: The Assembly Line Wrap Jacket (times two)
Some patterns sneak up on you. This project started out as a practical shop sample which took me a couple of weeks to slowly cut out and put together, as a job - a not unpleasant one, granted - rather than a passion project.
The moment I tried it on however, I wanted one for myself. In a cosy wool. NOW!
Adelaide has been so cold lately (by Adelaide standards) and I lacked the mid-length jacket or cardigan this weather demands. The Assembly Line Wrap Jacket combines unlined, raglan-sleeve softness with long, clean lines for a mix of comfort and put-togetherness. This pattern was formerly known as the Kimono Jacket but, as with a number of similarly-named patterns by other designers, has changed name to respect the cultural importance of the traditional Japanese garment.
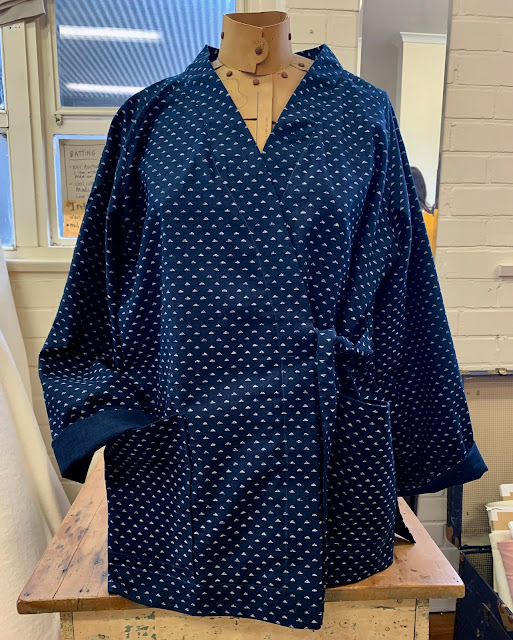
The shop sample shown above is made in 'This Way Up' Japanese Textured Indigo Cloth, a white print on yarn-dyed indigo-coloured cotton. This fabric is 110cm wide, while the pattern only states fabric requirements for 140cm+ width. I laid out my Size M pattern pieces and this took 2.5m of 110cm width. My fabric was directional but I think you would still need 2.5m in a non-directional.
For 'my' version I cut 2m as per pattern of our Velvet Finish 100% Australian Wool in Deep Navy. I didn't consult the pattern layout before I cut, and this actually has pieces running in both directions - but my fabric has a nap - gasp! With some careful juggling I managed to squeeze the Size M jacket out of the 2m, folded, as shown below. So please bear this in mind if you're working with a directional fabric. An extra 20 - 30cm might make all the difference.
The construction is rather nifty, especially the creation of the collar which also makes a dart for shaping on the front bodice. I followed all instructions to the letter, except I bound my seams and hem edges with Liberty.
It just makes me so happy to see Liberty bound seams in an unlined jacket. In the wool version, I bound everything except the small shoulder darts. Here it is inside out:
This pleasingly used almost every last scrap of a single fat quarter cut of our new 'Isadora C' tana lawn (cut in 1.5" bias strips and folded using the red Clover bias maker). You can see I also added a 'me made' label by Kylie and The Machine.
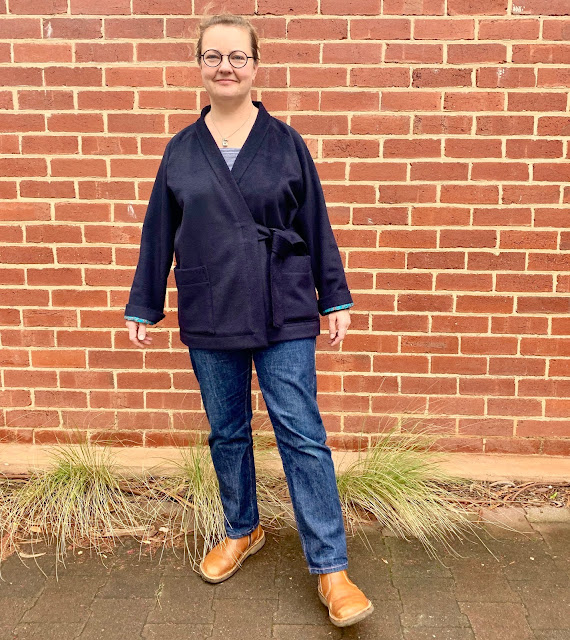
And here it is in action.
My only comment on the fit is that the sleeves are quite long, but this allows me to fold them up and show a bit of binding if I wish, or roll them down for extra hand warming. Yes, it does have a little bit of a dressing gown vibe but you know? I don't care. I think it's actually something I love about The Assembly Line patterns: they're not afraid to make a little bit of a statement, while being comfy as heck.
Both fabrics were a pleasure to work with, and the wool especially was a dream. It's so stable, cuts like butter, barely frays and really doesn't distort at all. I used a walking foot for the majority of the wool construction, which helped the thick layers pass smoothly through the machine. The wool responded well to pressing using a 'pressing cloth' (i.e. teatowel), pressing on the back of the fabric wherever possible, and using a 'clapper' (improvised bit of flat wood pressed down after the iron) to hold in the steam and set the crease. When pressing the belt straps, I also used fine Entomology Pins to hold the seam flat - pinned right into the ironing board padding, you can just see the tiny ends below - before I lowered the iron.
This wool, also available in Mulberry and Black, is excess stock from a local, ethical design company. It's incredibly beautiful and a feel-good purchase to boot.
Note here that if you are using a fabric that is shifty and/or fray-prone, there's a fair bit of handling of the garment while some raw edges, particularly angles and curves at the top, are still unsewn. It might pay to use quite a bit of stay-stitching or other stabilisation technique.
I have comfortably worn this jacket all day whilst doing a number of tasks at home and at work. The inside button fastening keeps it securely in place while done up. If worn open, the jacket ties don't make a nuisance of themselves. The pockets are a fabulously useful size and perfectly placed. Small details like elbow and shoulder darts and topstitching elevate this jacket's finish but it's a really achievable one-day sew. Can you tell I love it?
SUMMARY
Pattern: The Wrap Jacket by The Assembly Line
Fabric: 2.5m 'This Way Up' Japanese Textured Indigo Cotton plus a fat quarter (50cm x 67.5cm) Liberty Tana Lawn 'Dapper Dogs' (version 1), 2m Velvet Finish 100% Australian Wool in Deep Navy (also available in Black and Mulberrry) plus a fat quarter Liberty Tana Lawn 'Isadora C' (version 2)
Size: M
Alterations: None except seam finish - bound instead of overlocked
Comments: I loved this more than I expected to. It's another winner from The Assembly Line!
- Jane xx


Comments
Post a Comment
We love to know who's reading and what you think so please leave us a comment! We'll also try to answer any questions you may have.