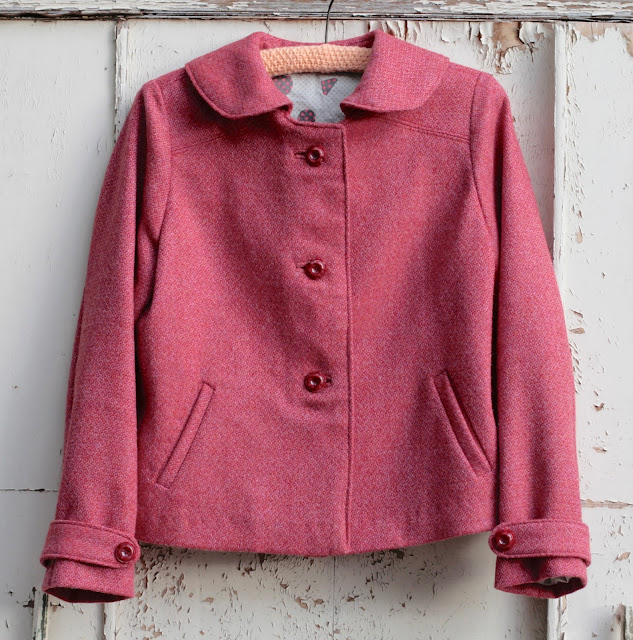
Pauline Alice Ninot Jacket in Garnet Wool
The adorable Ninot jacket pattern by Pauline Alice has been calling my name for a while. When this 100% wool in 'Garnet' arrived in the shop, I'd found the perfect match.
(Long project = long blog post so grab a cup of tea!)
 Making a jacket can be quite a process, and I wanted to 'skill up' and take my time with this, learning some things along the way. Welt pockets and bound buttonholes were a first for me. The instructions for these were quite good, although I could have used a few more diagrams. I took my time and used a lot of hand-basting to hold things in place.

 The buttons, by the way, are gorgeous vintage ones from Our Beautiful Pieces on Unley Road. Quite a dangerous place to visit for the vintage button lover!
The jacket has a lovely swingy back pleat. There's an optional back button tab across the pleat, which I made. To be honest I ran out of buttons so didn't attach it! I'm still toying with the idea of removing the sleeve tabs - which are purely decorative - and putting the back tab on.
 During construction, I found it useful to set up a 'project basket' for all the pieces, and I kept the cut fabric pinned to its paper pattern pieces as long as possible to help identify them. On fabric like this wool I find tailor's tacks (loops of contrasting thread) to be the best way to mark things like buttonhole and pocket placement.
 The collar construction was a little different to any collar I'd made before. First there was a steaming process to shape the under-collar.
 Then the under collar is attached to the jacket body, and the upper collar is attached to the neck facing (that goes inside the jacket) and the whole collar/jacket and collar/facings are sewn together around the edges. This leaves the neckline edges of under and upper collar pieces unattached to each other and a whole bunch of untamed seam allowances inside there.
I also wrestled with the corner where the collar joins the neckline.
 There's a lot of fabric there, because at this point there's also a shoulder yoke seam joining in the fun. Eek! I snipped, and graded, and snipped, and graded, and pressed, and pressed, and eventually topstitched everything into submission. At this point I was wondering if any of the steam-shaping of the under collar would have survived all this brutal handling. It looks fine, but I would suggest if you have a different, favourite method of attaching this style of collar, that perhaps you try that instead!
I turned to the wisdom of Instagram sewing friends, and was informed by the lovely and highly accomplished Nicole that this style of collar attachment is common in vintage patterns (which made me feel kinder towards it). She recommended I press the neckline seams open, try the jacket on, fiddle around with the collar until I was happy with it and then do a bit of 'stitch in the ditch' at the neckline seam to join the upper and under collar together. This worked well; I hand-stitched it for accuracy and easier unpicking if necessary.
 I'm not a big fan of shoulder pads on me, but I felt that a little support in the sleeve head and shoulder could help the jacket sit well and look more tailored. I found this post about sleeve heads at Gertie's New Blog For Better Sewing and used the pictures and descriptions to fashion two light shoulder supports from quilt batting and bias-cut cotton voile. They're attached to the shoulder seam allowance and provide the subtle, non-bulky support I was after.
 I must confess now that I did not make a muslin (shame!) and had taken an educated guess at my sizing. Figuring the swingy shape of the jacket was fairly bust-accommodating, and wanting to fit my narrow shoulders, I used my upper bust measurement to select my size. The shoulder fit is great but I hit a little snag with the sleeve linings. The sleeves are quite narrow and I had chosen a cotton lawn for lining, which is not very slippery and has zero 'give'. The result was sleeves that were difficult to put on and a bit uncomfortable to move around in. Once again Nicole came to the rescue by recommending stretch satin as a sleeve lining. Arm movement restored!
 Actually I wouldn't rule out replacing the rest of the lining with something slinkier, because I think it would make the jacket sit more smoothly. Much as I adore this Cotton + Steel lawn and the way it looks inside here, it is a bit 'grippy' for this semi-fitted style of jacket. See below? A bit rumpled? Lesson learnt, and not unfixable.
 Also, I probably ought to have made a full bust adjustment. Will She Ever Learn.
Eye roll at self.
 Nevertheless, I love my new jacket and I'm looking forward to wearing it a lot this winter, and for many winters to come.
 PATTERN: Pauline Alice Ninot, View A plus button tabs of View B
FABRIC: 2 metres of 100% Wool, Garnet. I wholeheartedly recommend this beautiful wool. It takes a steamy iron like a trouper, although for the first time I found myself wishing for a clapper to hold in that steam and flatten it, because the wool just wants to bounce right back.
Lining: Cotton + Steel cotton lawn (very pretty but not ideal), stretch satin from DK Fabrics.
SIZE: 40, no adjustments. NB: I am 163cm/5ft3 and anyone taller or with a longer torso may wish to consider lengthening the body of the jacket.
COMMENTS: A lovely style and a pattern that encourages you to take your time over details like optional bound buttonholes, collar steaming and hand-finishing of the hems. The instructions are not quite as thorough as my only previous jacket, the fabulous Grainline Cascade, but with the help of the most excellent online sewing community, I made it to the finish line. Hooray!
Other recommended fabrics: woven wools & wool blends from our selection here (not boiled wool or knits), mid-heavy denim, twill or canvas here.
- Jane & Fiona xx
(Long project = long blog post so grab a cup of tea!)


The jacket has a lovely swingy back pleat. There's an optional back button tab across the pleat, which I made. To be honest I ran out of buttons so didn't attach it! I'm still toying with the idea of removing the sleeve tabs - which are purely decorative - and putting the back tab on.


I also wrestled with the corner where the collar joins the neckline.

I turned to the wisdom of Instagram sewing friends, and was informed by the lovely and highly accomplished Nicole that this style of collar attachment is common in vintage patterns (which made me feel kinder towards it). She recommended I press the neckline seams open, try the jacket on, fiddle around with the collar until I was happy with it and then do a bit of 'stitch in the ditch' at the neckline seam to join the upper and under collar together. This worked well; I hand-stitched it for accuracy and easier unpicking if necessary.


Eye roll at self.


FABRIC: 2 metres of 100% Wool, Garnet. I wholeheartedly recommend this beautiful wool. It takes a steamy iron like a trouper, although for the first time I found myself wishing for a clapper to hold in that steam and flatten it, because the wool just wants to bounce right back.
Lining: Cotton + Steel cotton lawn (very pretty but not ideal), stretch satin from DK Fabrics.
SIZE: 40, no adjustments. NB: I am 163cm/5ft3 and anyone taller or with a longer torso may wish to consider lengthening the body of the jacket.
COMMENTS: A lovely style and a pattern that encourages you to take your time over details like optional bound buttonholes, collar steaming and hand-finishing of the hems. The instructions are not quite as thorough as my only previous jacket, the fabulous Grainline Cascade, but with the help of the most excellent online sewing community, I made it to the finish line. Hooray!
Other recommended fabrics: woven wools & wool blends from our selection here (not boiled wool or knits), mid-heavy denim, twill or canvas here.
- Jane & Fiona xx


Fantastic make, Jane!! So beautifully constructed! And I do love the looks of the lawn inside, but tend to prefer a "slippery lining" on jackets as well, because it does seem to have less grab and static. You are a tailoring star! Did you use fancy interfacing for this? I have recently felt dissatisfied with my usual fusible interfacings, I'm becoming more picky about them and I don't like the way they bubble and pucker after a wash. What do you recommend for a higher quality finish?
ReplyDeleteThanks so much Inder :) It was really worth taking time over this. The interfacing I used is the cotton woven fusible we stock. It's really nice and we highly recommend it for shirt collars and cuffs, facings and the like. It's a Vilene product and like a fine cotton voile with one fusible side. Having said that, it may not have been the ideal one for this project... it probably could have used a slightly heavier weight. And maybe a sew-in, because the wool just did not want to permanently stick to the interfacing, which is the only time I've had trouble with this stuff bubbling a bit. It was just the nature of the wool. I think I will end up changing the lining. Because hey, I can!
Delete