Colette Hawthorn dress pattern
The beautiful Hawthorn shirt dress pattern was released by Colette Patterns earlier this year. It has a slightly 1950s vibe with a flattering semi-circle skirt that flares out from (rather than gathers into) the seam at the natural waist. Make it 3/4 sleeve, short sleeve or sleeveless to suit any spring or summer day. If you're into the peplum thing, you can even make it as a shirt.
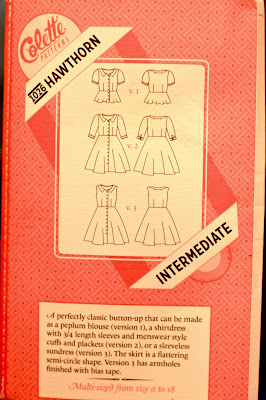
The sweetly elegant collar reveals just a nice amount of neck & shoulder (or a short necklace), without being low-cut.
Colette patterns are renowned for their excellent instructions and finishing detail and this pattern is no exception. There is also a step-by-step sewalong on the Colette website with many helpful photographs of the process.

This version is made in a Liberty Tana Lawn (from personal stash - but we have beautiful options in store). Aside from the Liberty we also have some lovely Japanese cotton lawns, and other suitable fabrics including organic cotton shirting, hemp/tencel blends, linen/cottons and 100% linens, washed (softened) and plain.
Make a muslin.
Few people are a 'standard' size. Since this pattern has a defined waist and fitted bodice, we recommend making a muslin - at least of the bodice if not more - to check the fit. A 'muslin' or 'toile' is a test version of your garment, without added details like collars, buttons and facings, and made from scrap fabric, old sheets or whatever's handy. It is most useful, however, to use a fabric that has a reasonably similar drape and body to the fabric you plan to use for your garment.
Seam allowances on Colette patterns are a generous 5/8" which makes it easy to make adjustments at the muslin stage if a little more room is required. Transfer your alterations to your pattern piece. You may wish to make a second muslin at this point to make sure the alterations work. Then you'll be sure to have a custom fit when you cut your 'good' fabric.

Fitting alterations in this version:
- length taken out of the bodice all around to fit to higher 'natural waist' (narrowest part of torso)
- widened at front darts and side seams to increase room in the waist
- small wedge trimmed off bottom middle of back bodice to make waist seam sit straight, where it was dipping down.
If making this version again, shortening the sleeve to match the waist alteration would create a slightly better-proportioned sleeve.

Tips:
- There is a small error in the collar sewing instructions (pg 17). Upper and lower collar pieces should be sewn together with a 1/4" seam allowance (rather than 5/8" as usually used throughout pattern). This will make the collar the correct size to fit the markings on the bodice neckline.
- When deciding on buttonhole placement, find the 'critical' button position first: that is, in the best position to stop any gaping at the bust. Then mark the top button placement, and work out the rest evenly spaced based upon those.
- If using a fine fabric like cotton lawn, and making the long sleeve, you may find the cuff (pg 39 - 40) does not come together accurately. We recommend that Step 7 (pg 40) be sewn with a 3/8" seam allowance while carefully holding other side of the cuff out of the way. (Not 1/4" seam allowance as stated.)
- We have some lovely, lightweight woven cotton fusible interfacing at The Drapery that is perfect for collars, cuffs and plackets on projects like the Hawthorn.
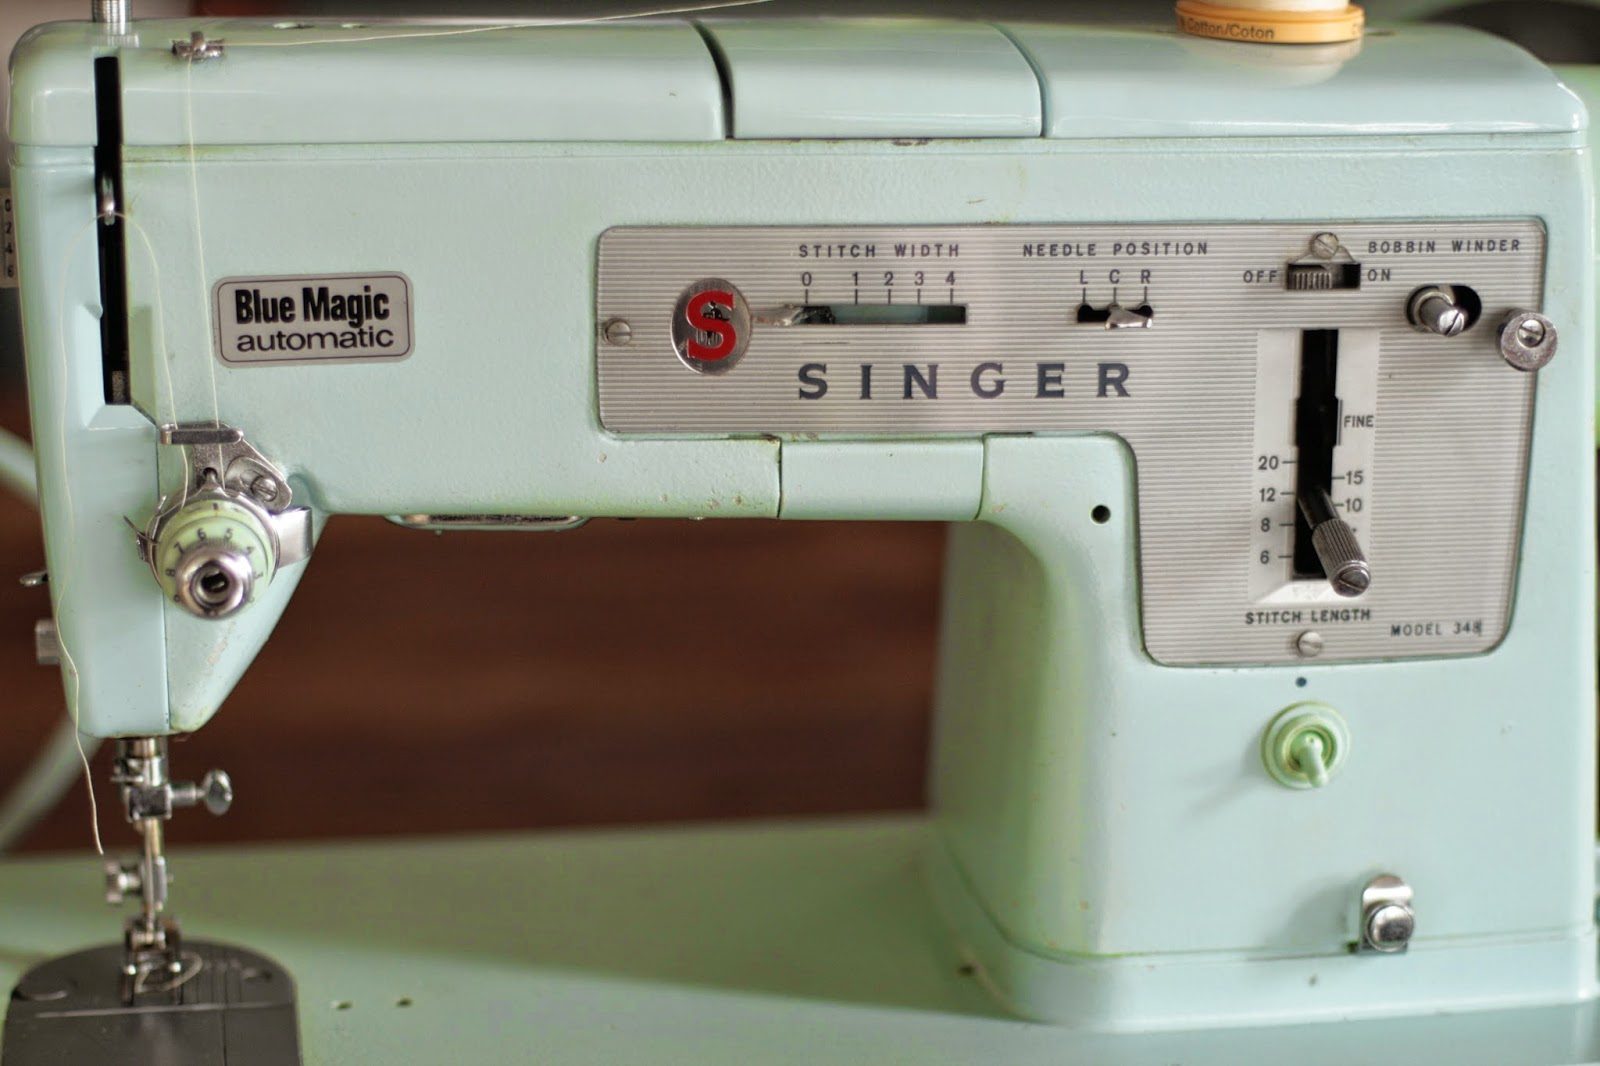
- If the idea of making buttonholes freaks you out, try laying your hands on an old Singer buttonhole maker attachment. It will fit any low-shank machine and we can give you a demo in-store if you like.
- Don't wear this super-twirly, fun dress on a windy day while walking along a main road! Or maybe do. Whatever floats your boat.

Check out more versions of the Hawthorn and other Colette patterns in the Colette flickr group.
- Jane & Fiona xx

The sweetly elegant collar reveals just a nice amount of neck & shoulder (or a short necklace), without being low-cut.
Colette patterns are renowned for their excellent instructions and finishing detail and this pattern is no exception. There is also a step-by-step sewalong on the Colette website with many helpful photographs of the process.

This version is made in a Liberty Tana Lawn (from personal stash - but we have beautiful options in store). Aside from the Liberty we also have some lovely Japanese cotton lawns, and other suitable fabrics including organic cotton shirting, hemp/tencel blends, linen/cottons and 100% linens, washed (softened) and plain.
Make a muslin.
Few people are a 'standard' size. Since this pattern has a defined waist and fitted bodice, we recommend making a muslin - at least of the bodice if not more - to check the fit. A 'muslin' or 'toile' is a test version of your garment, without added details like collars, buttons and facings, and made from scrap fabric, old sheets or whatever's handy. It is most useful, however, to use a fabric that has a reasonably similar drape and body to the fabric you plan to use for your garment.
Seam allowances on Colette patterns are a generous 5/8" which makes it easy to make adjustments at the muslin stage if a little more room is required. Transfer your alterations to your pattern piece. You may wish to make a second muslin at this point to make sure the alterations work. Then you'll be sure to have a custom fit when you cut your 'good' fabric.

Fitting alterations in this version:
- length taken out of the bodice all around to fit to higher 'natural waist' (narrowest part of torso)
- widened at front darts and side seams to increase room in the waist
- small wedge trimmed off bottom middle of back bodice to make waist seam sit straight, where it was dipping down.
If making this version again, shortening the sleeve to match the waist alteration would create a slightly better-proportioned sleeve.

Tips:
- There is a small error in the collar sewing instructions (pg 17). Upper and lower collar pieces should be sewn together with a 1/4" seam allowance (rather than 5/8" as usually used throughout pattern). This will make the collar the correct size to fit the markings on the bodice neckline.
- When deciding on buttonhole placement, find the 'critical' button position first: that is, in the best position to stop any gaping at the bust. Then mark the top button placement, and work out the rest evenly spaced based upon those.
- If using a fine fabric like cotton lawn, and making the long sleeve, you may find the cuff (pg 39 - 40) does not come together accurately. We recommend that Step 7 (pg 40) be sewn with a 3/8" seam allowance while carefully holding other side of the cuff out of the way. (Not 1/4" seam allowance as stated.)
- We have some lovely, lightweight woven cotton fusible interfacing at The Drapery that is perfect for collars, cuffs and plackets on projects like the Hawthorn.
- If the idea of making buttonholes freaks you out, try laying your hands on an old Singer buttonhole maker attachment. It will fit any low-shank machine and we can give you a demo in-store if you like.
- Don't wear this super-twirly, fun dress on a windy day while walking along a main road! Or maybe do. Whatever floats your boat.

Check out more versions of the Hawthorn and other Colette patterns in the Colette flickr group.
- Jane & Fiona xx


Comments
Post a Comment
We love to know who's reading and what you think so please leave us a comment! We'll also try to answer any questions you may have.